- Fri 03 August 2007
- macintosh
- Gaige B. Paulsen
Many of you Macintosh users out there are concerned for the safety and security of your data. This article will describe how to use the built-in disk image capability of the Macintosh to create a secure file storage location for your important documents.
Disk Images are special files that function very similarly to CDs or hard drives when loaded on your computer. They are created with the Apple Disk Utility and can be treated like normal disks when in use. If you download software from the Internet for your Macintosh, you're probably familiar with their use, as many Macintosh programs, including our own LoadMyTracks, use them as a software delivery method. Once downloaded, they show up in the finder looking like an external disk and can be ejected and copied from, just like a CDROM.
The best part about Disk Images is that they can be encrypted. As such, it's like carrying around a password-encrypted thumb-drive without having to carry around the thumb drive. Of course, unlike a thumb-drive, if you lose your laptop, your Disk Image is gone as well, so you will still need to back them up. In fact, you could store your Disk Image on a thumb drive if you wanted to be very secure (but don't lose the thumb drive). As you can imagine, another benefit of encrypted Disk Images is that they can be backed up by dragging the encrypted Disk Image to another computer or hard drive or thumb drive or putting it on tape. No matter where you put it, the data remains encrypted.
So, How do I create one of these?
- In the Finder, go to Applications and then to Utilities. Locate Disk Utility and double-click to launch it.
- Click on the New Image button.
A window will appear
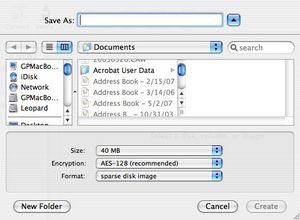 .
Set the type to Sparse Disk Image and the encryption to AES-128. Then,
set the size to be something a bit larger than what you expect to need.
This can be expanded in the future, but it's a pain in the neck,
so error on the side of a little too large.
Note: it won't take up that much space on disk for now...
sparse images begin smaller than the full size and grow up until the maximum
size. Also, for some reason, when I create a sparse image of 40MB, it tends
to have a smidge more than 32MB of storage space, so you might want to bump
your estimates by 10MB.
.
Set the type to Sparse Disk Image and the encryption to AES-128. Then,
set the size to be something a bit larger than what you expect to need.
This can be expanded in the future, but it's a pain in the neck,
so error on the side of a little too large.
Note: it won't take up that much space on disk for now...
sparse images begin smaller than the full size and grow up until the maximum
size. Also, for some reason, when I create a sparse image of 40MB, it tends
to have a smidge more than 32MB of storage space, so you might want to bump
your estimates by 10MB. - After clicking OK, you will be asked for the password. Two things to remember about this password. First is that if you lose it, the data is pretty completely unrecoverable. AES-128 is breakable, but you're going to need friends at the NSA with time on their hands if you use a good password. Second, the Mac will remember it in your keychain. So, make a good password, and keep it safe, but don't worry about having to type it all the time, because the keychain is your friend.
- Once you've selected a password, your encrypted disk image will show up in the Finder and you'll be ready to use it.
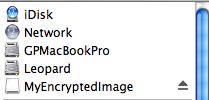
Now that you've got an encrypted Disk Image, you'll need to take good care of it. Remember to unmount it (hit the eject button next to it in the finder) whenever you stop using your confidential data. This way, you'll need a password to open it up again.
Also, if you are storing your Disk Image on a thumbdrive, you should make sure you successfully eject the Disk Image before removing the thumbdrive from your Macintosh. Not doing so will result in corrupted data and will be very very bad.
Loading things up
Chances are that you already had some confidential data on your computer. Because of this, you're going to need to make sure that you move that data to the Disk Image and then remove it safely. This is fortunately very easy on the Mac. Find your data files and drag-and-drop copy them to the Disk Image when it is loaded on the computer. If you've already ejected it, you'll need to double-click on it and enter the password to mount it again.
Once you've drag copied them to the Disk Image, you'll want to drop them into the trash. BUT, don't empty the trash yet. There's a little-used option on the Mac to securely erase files in the trash. This is a fast and effective way to obliterate the data that was stored for this file. Now, it's not going to completely remove all traces (if you've been reading and writing Quicken files to your hard drive, there are probably deleted fragments all over your hard disk), but it's going to remove the most recent copies. To use this, go to the Finder menu and select Secure Empty Trash. That's all there is to it.
Now, if you're really interested in removing all trace of the previously existing files, there's a way to do that too. It is unfortunately time consuming, but it does work. Definitely one of those "start before going to sleep" options. To do this, go into Disk Utility again, and click on your hard drive. From there, select Erase (scary isn't it) and push the Erase Free Space... button. It'll then ask you how secure you want to be (more time== more security). Once you click OK, it's time to nod off.
Usage Tips
Some programs work more easily with Disk Images than others. As a general rule, you want to mount up the disk image before you start the program that you are using it with. This is particularly the case with programs like Quicken that remember your last open file and try to re-open it.
Many people find that dragging the Disk Image file to the dock (on the right side of the line) is an easy way to locate the Disk Image for future mounting.
You might choose to not store your Disk Image password in the Keychain (you can always use Keychain Access to remove it after the fact) if you want to make sure that the password is entered each time that you mount the disk. For added security, this is a good way to handle things... unless it leads you to use a bad password or write the password down someplace stupid.
To make sure that your keychain is locked appropriately, consider using the Security Preferences (in System Preferences) to turn on "require password to wake from sleep" and use the Login Options to disable "Automatically log in as". These are good steps to take anyway if you have a laptop, a roommate, or others you might not trust to see your confidential information.
Good luck and enjoy the feeling of safer data.